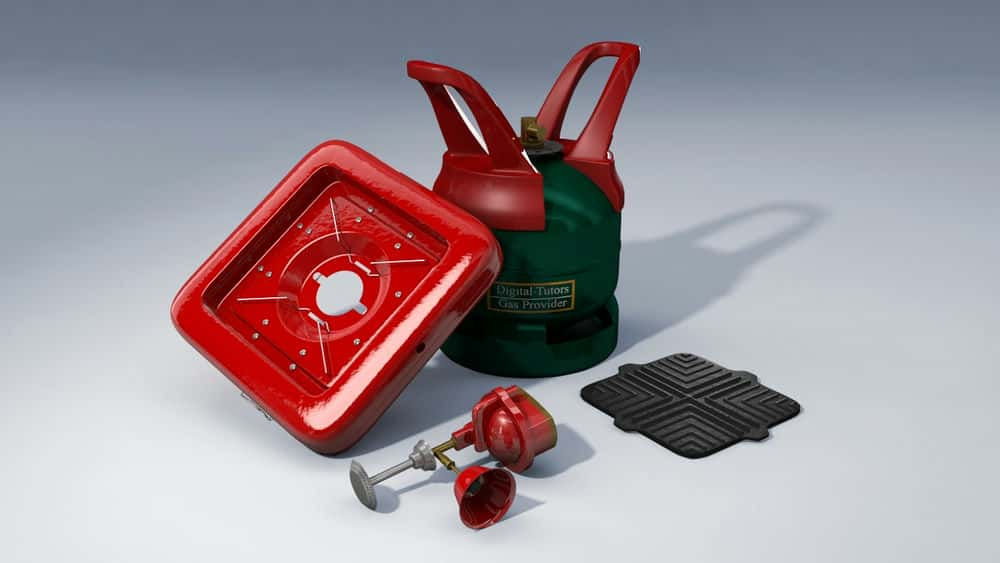
آموزش ایجاد رندرهای محصول واقع بینانه و موثر در مایا - آخرین آپدیت
Creating Realistic and Effective Product Renders in Maya
نکته:
ممکن هست محتوای این صفحه بروز نباشد ولی دانلود دوره آخرین آپدیت می باشد.
نمونه ویدیویی برای نمایش وجود ندارد.
سرفصل ها و درس ها
مقدمه و بررسی اجمالی پروژه Introduction and Project Overview
-
مقدمه و بررسی اجمالی پروژه Introduction and Project Overview
ایجاد رندرهای محصول واقع بینانه و موثر در Maya Pt. 1 Creating Realistic and Effective Product Renders in Maya Pt. 1
-
نمای کلی افزونه ها Overview of the Plugins
-
توضیح مختصر دو پلاگین Brief Explanation of the Two Plugins
-
نگاهی گذرا به میانبرها A Quick Look at Shortcuts
-
مروری بر عکسهای مرجع پروژه Overview of the Project Reference Photos
-
شروع قسمت اول بدنه اصلی Beginning the First Part of the Main Body
-
ادامه ساخت بدنه اصلی بطری گاز Continuing to Build the Gas Bottle Main Body
-
ترکیب برخی از قسمتهای اصلی بدنه بطری گاز Combining Some Parts of the Gas Bottle Main Body
-
با استفاده از ابزارهای Bevel و Extrude Using the Bevel and Extrude Tools
-
با استفاده از Extrude Edge Tool Using the Extrude Edge Tool
-
ادامه ساخت بطری گاز Continuing the Build of the Gas Bottle
-
رفع مشکلات و حفظ شکل استوانه ای Fixing Problems and Keeping the Cylindrical Shape
-
با استفاده از عملکرد ویژه تکراری Using the Duplicate Special Function
-
استفاده از یک مرجع برای بهتر شکل دادن به پایه Using a Reference Object to Better Shape the Base
-
بهینه سازی پایه بطری گاز Tweaking the Gas Bottle Base
-
اضافه کردن برخی از ضخامت به پایه Adding Some Thickness to the Base
-
افزودن جزئیات به بدنه اصلی بطری گاز Adding Details to the Gas Bottle Main Body
-
ساختن شی Disc به شکل دیسک بر روی بطری گاز Building the Disc Shaped Object on the Gas Bottle
-
افزودن هندسه بیشتر برای به حداقل رساندن کشش Adding More Geometry to Minimize Stretching
-
افزودن ضخامت به شی Disc شکل دیسک Adding Thickness to the Disc Shaped Object
ایجاد رندرهای محصول واقع بینانه و موثر در Maya Pt. 2 Creating Realistic and Effective Product Renders in Maya Pt. 2
-
اولین تلاش برای اتمام شی Disc به شکل دیسک First Attempt to Finishing the Disc Shaped Object
-
پالایش گردن بطری گاز Refining the Gas Bottle Neck
-
افزودن پیچ اول Adding the First Bolt
-
با استفاده از ابزار Fillet Using the Fillet Tool
-
مسدود کردن شکل پایه تنظیم کننده پایگاه Blocking the Base Shape of the Regulator Base
-
ادامه ساخت پایگاه تنظیم کننده گاز Continuing the Build of the Gas Regulator Base
-
افزودن هندسه به پایه تنظیم کننده Adding Geometry to the Base of the Regulator
-
افزودن جزئیات به پایگاه تنظیم کننده Adding Details to the Base of the Regulator
-
پایان بخش اول پایگاه Finishing the First Part of the Base
-
جلوگیری از اشکال قسمت کروی Blocking out the Shapes of the Spherical Part
-
بهینه سازی شی C استوانه ای Tweaking the Cylindrical Object
-
تصفیه و اتمام شی C استوانه ای Refining and Finishing the Cylindrical Object
-
ادامه شی مستطیلی تنظیم کننده Continuing the Rectangular Object of the Regulator
-
اتمام شی R مستطیل شکل Finishing the Rectangular Object
-
شکل دادن به Ring Ring Shaping out the Ring Object
-
در پایان شی حلقه Finishing the Ring Object
-
افزودن دو پیچ کروی Adding Two Spherical Bolts
-
تکمیل و گروه بندی دستگیره Finishing and Grouping the Knob
-
شروع گروه دوم Beginning the Second Group
-
ادامه لوله ها و پیچ و مهره ها Continuing the Pipes and Bolts
ایجاد رندرهای محصول واقع بینانه و موثر در Maya Pt. 3 Creating Realistic and Effective Product Renders in Maya Pt. 3
-
شروع زنگوله ای که لوله ها را پوشش می دهد Beginning the Bell That Covers the Pipes
-
اتمام شی B زنگ دار Finishing the Bell Shaped Object
-
مدل سازی اجاق گاز شعله Modeling the Flame Cooker
-
مدل سازی دارنده فلز Modeling the Metal Holder
-
شروع شی Second زنگ دار دوم Beginning the Second Bell Shaped Object
-
شروع دکمه دوم Beginning the Second Knob
-
پایان دادن به دستگیره دوم Finishing the Second Knob
-
تغییر و سازماندهی مجدد آنچه که تاکنون ساخته ایم Tweaking and Reorganizing What We Built so Far
-
با استفاده از ابزار Slide Edge. Using the Slide Edge Tool.
-
ادامه ساخت دسته های بطری گاز Continuing the Build of the Gas Bottle Handles
-
استفاده از تغییر شکل دهنده خم برای دستیابی به شکل قوس Using the Bend Deformer to Achieve the Arch Shape
-
تصفیه دسته های بطری گاز Refining the Gas Bottle Handles
-
تصفیه پایه دستگیره Refining the Handle Base
-
ساخت دسته های بطری گاز Finishing the Build of the Gas Bottle Handles
-
آغاز مدل سازی ظروف فلزی Beginning of the Metal Container Modeling
-
تطبیق توپولوژی قسمت پایین Adapting the Bottom Part Topology
-
شکل دادن به یک تورفتگی Shaping out an Indent
-
سوراخ ظرف فلزی را برش دهید Cutting the Hole of the Metal Container
-
دستکاری موقعیت عمودی ها Tweaking the Vertices' Position
-
خارج کردن قدم کوچک از مرز سوراخ Extruding the Small Step out of the Hole Border
ایجاد رندرهای محصول واقع بینانه و موثر در Maya Pt. 4 Creating Realistic and Effective Product Renders in Maya Pt. 4
-
در حال پایان دادن به قسمت داخلی ظرف Finishing the Internal Part of the Container
-
شروع به تراشیدن سوراخ های کناری Beginning to Carve the Side Holes
-
با استفاده از Split Tools شکل Holes را اصلاح کنید Refine the Holes Shape by Using the Split Tools
-
ادامه ساخت ظروف فلزی Continuing the Build of the Metal Container
-
بیرون کشیدن فلپ ها از پایین اصلی Extruding the Flaps out of the Main Bottom
-
پایان پوسته پایین Finishing the Bottom Shell
-
مدل سازی اولین گروه پیچ و مهره ها Modeling the First Group of Bolts
-
شروع دارنده های اسلحه فلزی Beginning the Metal Arms Holders
-
دادن شکل صحیح به دارندگان Giving the Holders the Correct Shape
-
پایان دادن به دارندگان اسلحه فلزی Finishing the Metal Arms Holders
-
پالایش موقعیت های پیچ و مهره Refining the Bolt Positions
-
اتمام یک نگهدارنده فلزی گریل Finishing One Grill Metal Holder
-
شروع ساخت بازوهای فلزی Beginning to Build the Metal Arms
-
با استفاده از ابزار Extrude Surface Using the Extrude Surface Tool
-
اتمام مدل بازوهای فلزی. Finishing the Model of Metal Arms.
-
آغاز مدل سازی کوره صفحه صفحات Beginning of the Stone Plate Grill Modeling
-
شروع الگوی سطح آن. Beginning Its Surface Pattern.
-
اتمام مدل سازی الگوی گریل Finishing the Modeling of the Grill Pattern
-
مرتب کردن صحنه Tidying up the Scene
-
ادامه نقشه برداری UV Continuing the UV Mapping
ایجاد رندرهای محصول واقع بینانه و موثر در Maya Pt. 5 Creating Realistic and Effective Product Renders in Maya Pt. 5
-
رفع کشش بطری گاز Fixing the Stretching of the Gas Bottle
-
پایان دادن به فرآیند نقشه برداری UV Finishing the UV Mapping Process
-
انجام نقشه های UV برای Flame Cooker Doing the UV Maps for the Flame Cooker
-
تنظیم صحنه ما برای رندر و نورپردازی Setting up Our Scene for Render and Lighting
-
شروع به حرکت اشیا into به موقعیت Beginning to Move the Objects into Position
-
اتمام ترکیب و موقعیت دوربین Finishing the Composition and Camera Position
-
کلید نور ، پر کردن نور و پیوند نور Key Light, Fill Light and Light Linking
-
رفع برخی از مشکلات گره های استفاده نشده و خالی Fixing Some Unused and Empty Nodes Problems
-
اضافه کردن یک چراغ حاشیه ای و پایان دادن به چراغ های تنظیم شده Adding a Rim Light and Finishing the Lights Set Up
-
فعال کردن چراغ های تصحیح رنگ و تنظیم نیرو Activating the Color Correction and Tweaking Lights
-
پایان دادن به روشنایی Finishing the Lighting
-
گره Ibl ، جمع آوری نهایی و تصحیح گاما Ibl Node, Final Gather, and Gamma Correction
-
سایه زدن به دستگیره ها و قطعات فلزی قرمز Shading the Handles and the Red Metal Parts
-
سایه زدن قطعات فلزی طلایی Shading the Golden Metal Parts
-
ادامه Shader of the Metal Container Continuing the Shader of the Metal Container
-
سایه زدن قطعات فلزی Chrome Shading the Chrome Metal Parts
-
ادامه ایجاد Shaders Continuing the Shaders Creation
-
ایجاد Shader برای صفحه سنگ Creating the Shaders for the Stone Plate
-
نقشه برداری UV از صفحه و الگوی سنگ گریل UV Mapping the Grill Stone Plate and Pattern
-
پایان UVs الگو Finishing the Pattern UVs
ایجاد رندرهای محصول واقع بینانه و موثر در Maya Pt. 6 Creating Realistic and Effective Product Renders in Maya Pt. 6
-
تست رندر و امتحان بافت Test Rendering and Trying the Texture
-
شروع بافت اجاق گاز Beginning the Cooker Textures
-
ادامه بافت اجاق گاز Continuing the Textures of the Cooker
-
معرفی گره لایه لایه. Introducing the Layered Texture Node.
-
بافت فلز با گره سر و صدا فراکتال Texturing the Metal with a Fractal Noise Node
-
نقشه برداری UV ظرف فلزی UV Mapping of the Metal Container
-
پایان دادن به نقشه برداری UV ظرف فلزی Finishing the UV Mapping of the Metal Container
-
تغییر برخی از ارزش ها Tweaking Some Values
-
تغییر سایه بان قطعات اجاق گاز Changing the Shader of the Cooker Parts
-
راه اندازی لایه های Render Setting up Render Layers
-
با استفاده از تنظیمات Render Tweaking the Render Settings
-
شروع به ساخت رندر ما Beginning to Composite Our Render
-
نهایی کردن تصویر ما Finalizing Our Image
https://donyad.com/d/a428
 Mauro Sanna
مائورو سانا یک هنرمند متولد طبیعی بود و همیشه به فن آوری های جدید ، هنر و بازی های ویدیویی علاقه داشت. وی به مدت هشت سال به عنوان طراح گرافیک ، رتوش عکس و نقاش دیجیتال کار کرد. مائورو در سال 1986 وقتی اولین کمودور آمیگا خود را خریداری کرد و Impulse Imagine ، NewTek Lightwave و Realsoft Real 3D را امتحان کرد عاشق 3D شد. وی بیش از شش سال تجربه در صنعت 3D CG دارد. او اکنون در نورتهمپتون انگلیس زندگی می کند و به عنوان یک ارشد ارشد 3D هنرمند کار می کند.




نمایش نظرات